
Microsoft’s Accessibility Checker (external website) was introduced in Office 2010 and improved over the years but was only available for Word and PowerPoint. Accessibility Checker checks for different things depending whether Word or PowerPoint is being used.
In March 2023 Accessibility Assistant (external website) for Microsoft 365 was launched and this has three important innovations:
• improved defaults so the issues are prevented before they occur
• in-context remediation to correct issues as they appear in real-time
• simple, clear guidance that appears within the flow of work
Colour Picker
There is a new colour picker in Microsoft 365 Apps that considers both the need for satisfactory contrast between text and background, and creative licence. This has two modes, one with an added tooltip which guides the user towards colours which have the required contrast, or when the high-contrast switch is toggled, this reduces the available options of colour to those that meet the contrast requirements, with an additional row of accessible choices that are aligned with the chosen design and theme.
Flow of work
The Accessibility Assistant works in the same way as the spellchecker and will flag each issue as it occurs, and will provide a simple fix at that point, which prevents a large number of problems requiring fixing when the document is finished.
Accessibility Assistant pane
This pane has a simple, well-organised interface, similar to Microsoft Editor (external website), with explanations that provide help to fix issues in plain-language, and as the user goes through the list, they are taken to the location of the problem, as the pane advocates a solution.
Availability within Office 365
Currently, it is available in several Microsoft 365 apps with more to follow in the future. Specifically, the Accessibility Assistant is available within:
• Microsoft Word: The tool provides real-time and in-context remediation for issues such as low text contrast and missing alt text for images, and offers a pane similar to Microsoft Editor for addressing issues at the end of the document creation process - Microsoft 365 blog (external website).
• SharePoint: The SharePoint Pages Authoring Accessibility Assistant checks for accessibility issues such as inconsistent heading structures, missing alt-text, blank links, and color contrast issues, making it easier to create inclusive SharePoint pages - Support Page for SharePoint Pages Authoring Accessibility Assistant (external website).
The Assistant is set to be expanded across more Microsoft 365 apps with the objective of replacing the existing Accessibility Checker and covering a broader range of issues. This will further streamline the process of creating content that is inclusive and accessible for all users. Updates and new features are often rolled out to Microsoft 365 Insiders first before becoming widely available - Microsoft 365 Insider Blog (external website).
Before starting
• Make sure Microsoft Word is up-to-date
• Make sure that Adobe Acrobat Pro is up-to-date
• Download PAC 2024 (external website)
Demo file
• An example file, Word-un-accessible.docx (DOCX 126KB), has been created which has issues that need to be corrected
Title, Author etc.
• While Title is the only field that is required, it is worth adding Tags for SEO, Subject, and right click on Author(s)’s name to “Remove Person” if you do not wish their name all over the internet – replace Author with organisation name
Headings
Use the headings built into Microsoft Word
The page content should be outlined in the headings, which helps AT users comprehend the page layout and navigate to interesting content:
- Main heading = Heading 1
- Sub-headings = Heading 2
- Sub-sub-headings = Heading 3 etc.
Lists
Use the inbuilt document list controls within Microsoft Word to add ordered lists (numbers) and unordered lists (bullet points)
AT users can understand lists created as lists because of the way content is organised
Lists will communicate helpful information such as:
- How many items the list has
- Where the list starts and where the list finishes
- Which list item the user is on
Hyperlinks
- The destination of links should be communicated accurately and clearly
- Use URL shortening services such as Bitly (external website) or TinyURL (external website) if the document is to be printed, if not, make sure the link text is meaningful (link shorteners can be viewed as a security risk as the destination cannot be seen unless the link has been clicked!)
- Screen readers will generally provide a list of links so make sure the link text is meaningful
- Do not use “click here” or “More information” for all the link text because it will not be possible to distinguish the links from each other
Alternative text for images (alt text)
• Alt text is used to convey the content of the image to those who can’t see it
• Screen readers will declare the image, then read the alt text
• Images that have no informative content and are purely decorative do not require alt text, but may require markup so that Assistive Technology understands that they should be ignored
• Remember to avoid punctuation as it is voiced
• MakeThingsAccessible has a guide to creating meaningful alternative text
Image use
• Only use images that support the text of the document
• Try avoiding the use of an image instead of text
• Make sure images have alt text unless they are decorative
Language
Leading screen reader software is multilingual.
Language of document
• The language of the document must be set so that screen readers will read the document using the correct language profile
Language of part of document
• Content within the document written in a different language to the document’s default language must be identified
Tables
• Do not use tables to control layout
• Use tables to communicate relationships between data
• Make sure headers are identified
• For WORD only - Provide a short descriptive caption for the table using Table Properties -> Alt Text
• Try to keep the table simple
• If the table is complicated, can it be split into multiple tables or into lists?
Plain English
• Make sure sentences are short and concise, around 20-25 words
• Make sure words are kept simple
• Use common words. Complicated longer words (8 or 9 letters) will cause readers to skip shorter words (3,4, or 5 letters) that follow
• Use an Active voice rather than a Passive voice
• Where possible, use words containing one to two syllables
• Aim the language used at the level of a 9 year old as recommended by GOV.UK (external website) – remember in the UK, 7.1 million adults read at, or below, the level of an average 9 year old. WCAG 3.15 Reading Level (AAA) (external website) recommends providing a simplified version of the text if it requires a reading age of more than 12 years old
• Use contractions, words made up of two short words joined with an apostrophe such as I’ve, can’t etc.
• Do not use double negatives
• Explain the unusual, to help give full information
Why use it?
• The use of Plain English helps all users, including those who’s English is not their main language, and those who have cognitive impairment
• If the content is easy to read, it will be easy to understand when converted into alternative formats such as braille, or being read aloud by a screen reader
• Clear content converts more easily into British Sign Language
Further help
• Free services, guides, and resources to help are available from the Plain English Campaign (external website)
• Measure the readability of the text using Hemingway Editor (external website)
Font
• Use a font that is “sans-serif” and clear such as Arial, Helvetica, or Verdana
• Minimum font-size of 12
• For continuous text, avoid using capitals - letters in lowercase are read more easily
• Do not use underlining and italics because they could make text harder to read
• Bold and large font can be helpful when emphasising and highlighting text
• Make sure that text is justified to the left, as this helps to make sure there is an even gap between words, and enables the start and end of each line to be found easily
Colour
• Do NOT use colour by itself to show meaning
Make sure that there is adequate contrast between background and text – use TPGi’s Colour Contrast Analyzer (CCA) (external website) to check contrast
I went to Review and then selected Check Accessibility in the Accessibility section of the toolbar.

The Accessibility Assistant then checked my document.

Color and Contrast
• Hard-to-read text contrast – 1
I clicked on

and the relevant text is highlighted
And a suggestion of 3 colours appears in the Accessibility Assistant pane

I selected the black, double clicked on it and the status changed to

Note: the button is disabled as the issue is fixed.
Media and Illustrations
• Missing alt text – 3
I clicked on

and it took me to the first image with an issue

And in the Accessibility Assistant pane, a “Missing alt text” field appeared where the image description can be entered.

NOTE: As well as manually entering the image description, Accessibility Assistant will generate the description too, and the image can also be marked as decorative.
For the second image

I was shown an automatically generated description

I modified this text to say Australian bush hat and then approved it.
The final image I marked as decorative and the status changed to

Tables
• Missing table header - 1
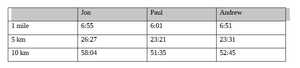
• Use of merged or split cells – 2
I started with the missing table header and clicked on

Which showed me the table which was missing a header
And highlighted where the header should be. I was given two options

As this is not a layout table, I will select

And the status changed to

I then selected

And the merged cell was highlighted

I have the option to split cells


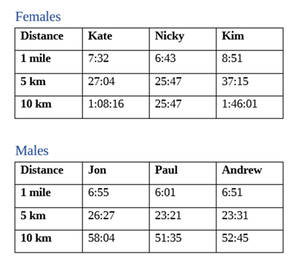
If you are not experienced with tables in Adobe Acrobat Pro (or other PDF remediation software), to fix this in real life I would split the table into a female table and a male table and then apply a heading to each table, which I have done.
Document Structure
• No headings in document - passed
Document Access
• Restricted access – passed
Accessibility Checker
The errors reported are:
Missing Object Description (1)
Missing Table Header (1)
Image or Object Not Inline (1)
The Warnings reported are:
- Use of Merged or Split Cells (2)
- Hard-to-Read Text Contrast (1)
Intelligent Services:
- Review Auto-Generated Description (2)
Accessibility Checker
This found the following:
• Hard-to-read text contrast (1)
• Missing alt text (3)
• Missing table header (1)
• Use of merged or split cells (2)
• Save as PDF with the following options are selected (Convert document information, Enable Accessibility and Reflow with tagged Adobe PDF, Create Bookmarks - Convert Word Headings to Bookmarks, Convert Comments), or
• Or if Adobe Acrobat Pro is installed, use the Acrobat tools in ribbon of Word
• In Preferences, make select Convert Document Information, Create Bookmarks, Add Links, Enable Accessibility and Reflow with tagged Adobe PDF
Note: Save as PDF” doesn’t add a
tag into each table row within the table that has the paths that make up the cell border, whereas Acrobat tools add a
tag into each table row within the table that has the paths that make up the cell border. The
tag into each table row within the table that has the paths that make up the cell border, requires artifaction in Adobe Acrobat Pro once the file is exported.
Artifacting objects
Header and Footer objects are artifacted when exported to PDF.
Issues to consider
• Fonts error can occur due to Word not embedding fonts when using “Save as” to create the PDF
• If “Initial View Show Document Title” is not selected in PDF, “Check for accessibility” when run in Adobe Acrobat Pro is likely to fail the Title
• When PDFMaker puts
<P>
tags into tables, in Adobe Acrobat Pro Artifact the contents of the
<P>
tag - click on
<P>
tag, click “Edit” Role Map, which maps artifact to
<P>
tag, delete item, rename
<Artifact>
to
<H1>
then select “Path” and Change Tag to Artifact so it is artifacted, delete tag
• If a Table splits over more than one page it will be a separate table on each page, fix this in Adobe Acrobat Pro by moving the rows on the second Table into the main table and then deleting the empty table. The other option is to change the table in Word so it doesn’t onto a second page
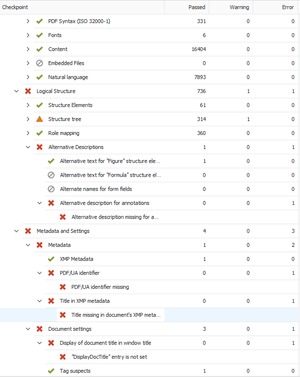
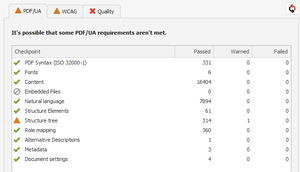
Open PAC 2024 (external website) and drag and drop the PDF file onto

The test will run and errors will be reported
Click on “Results in Detail” button and drill down into the details
Fixing these issues
• Open file in Adobe Acrobat Pro
• Make sure that the file is saved at this point
• It is worth making various versions in case a change doesn’t allow rollback!
Alternative description missing for an annotation
This error occurs because the PDF/UA standard requires all hyperlinks have alternative text.
Go to the Preflight panel (search for Preflight in “Find text or tools” search in Acrobat)

Make sure

is chosen and click on

Scroll down and under the Interactive elements and properties

The PDF standard wants a contents entry to be added to the link which will provide the alternate text, DO NOT put the alternate text in the Alternate Text field!
Select
and then click on

Save a new version (just to be on the safe side)
If links such as “Click here” were in the text rather than meaningful text, when the “fix” was run, it would technically pass but the text would be wrong and meaningless.
Title missing in document’s XMP metadata
This error occurs the document has not got a title set.
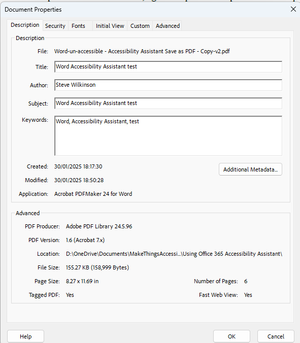
Go to Menu -> Document properties

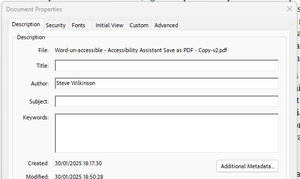
Add a Title, Subject and any applicable keywords.
PDF/UA identifier missing
The PDF/UA identifier indicates that the file meets the PDF/UA Standard and this should be done at the end when the file actually is PDF/UA compliant.
Note: this can be added to a file that is NOT compliant but this does not mean that the file will then be compliant.
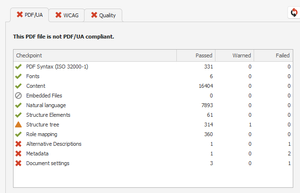
PAC 2024 gives an PDF/UA identifier missing error
Open the Preflight panel by searching for Preflight in the “Find text or tools” search box
Make sure
is chosen and click on
In “Document info and Metadata” select

and click

Save new version of file (just to be on the safe side).
Now there are not any errors in PAC 2024
• A Microsoft 365 accessibility assistant will make content easier to see (external website)
• An Evolution in Microsoft Office Accessibility (external website)
• Create inclusive content with the new Accessibility Assistant in Microsoft 365 (external website)
• Improve accessibility in your documents with the Accessibility Assistant (external website)
• Microsoft 365’s newest assistant will point out when you make stuff less accessible (external website)
• Microsoft 365 blog (external website)
• Support Page for SharePoint Pages Authoring Accessibility Assistant (external website)
• Microsoft 365 Insider Blog (external website)